Introduction
Adding text in DaVinci Resolve is an essential skill for anyone involved in video editing, whether you’re creating YouTube videos, promotional content, or cinematic projects. Unlike simple drag-and-drop software, DaVinci Resolve offers a wide range of text tools that allow you to create professional titles, lower thirds, captions, and dynamic motion graphics. However, many beginners struggle with understanding the different text options, how to style them effectively, and how to animate them for impact. In this guide, we’ll walk you through how to add text in DaVinci Resolve step by step, explore advanced techniques for customization, and provide tips to maintain a smooth workflow.

Understanding Text Options in DaVinci Resolve
DaVinci Resolve offers two main ways to add text: the Edit page Text tools and the Fusion page Text tools. Both have distinct purposes.
Edit Page Text
The Edit page is ideal for straightforward titles, subtitles, or captions. Here, you can use Text or Text+ tools:Text: Basic text layer with simple formatting like font, size, color, and alignment. Perfect for quick titles or lower thirds.
Text+: Advanced text with animation, shading, and 3D capabilities. It allows for more creative freedom, including keyframe animation, tracking, and gradient effects.
Fusion Page Text
Fusion offers node-based compositing for ultimate control over text effects. You can create complex motion graphics, particle-based text, or even integrate text into 3D scenes. While it has a steeper learning curve, it’s invaluable for professional editors.
Step 1: Create a New Project and Import Media
Before adding text, start by launching DaVinci Resolve and creating a new project. Import your video clips, images, or backgrounds into the Media Pool. Make sure your timeline is correctly set up for the resolution and frame rate of your project, as this affects text clarity and animation smoothness.
Step 2: Add Text in the Edit Page
Navigate to the Edit page.
Open the Effects Library on the top left.
Under Titles, you’ll find options like Text, Text+, Lower Thirds, and Scrolling Text.
Drag your desired text type onto the timeline above your video or background.
Step 3: Customize Your Text
After adding text, you can customize it in the Inspector panel:
Font and Size: Choose from thousands of fonts installed on your system, including Google Fonts or Adobe Fonts.
Color and Shadow: Adjust text color, outline, shadow, and glow for readability and style.
Positioning and Rotation: Place text anywhere on the screen, rotate it for dynamic layouts, or anchor it to a moving object.
Tracking and Kerning: Fine-tune the spacing between characters or lines for better visual balance.
Pro tip: For professional videos, always check the legibility of your text on multiple devices. Mobile viewers may require larger fonts and higher contrast.
Step 4: Animate Text Using Keyframes
Text animation can make your titles more engaging. In the Inspector, click the diamond icon next to parameters like Position, Opacity, or Size to create keyframes. Move the playhead along the timeline and adjust the settings to generate motion effects such as sliding, fading, or scaling text.
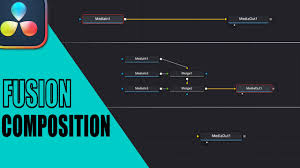
Step 5: Advanced Text with Fusion
For editors seeking more creativity, the Fusion page offers unparalleled control:
Select your clip and click Fusion at the bottom of the interface.
Add a Text+ node and connect it to a MediaOut node.
Use Transform nodes to move, rotate, or scale text.
Apply Modifiers, Gradient Maps, or Particle Effects for complex visuals.
Fusion allows you to create cinematic opening titles, animated lower thirds, or even integrate text into 3D environments.
Step 6: Exporting Your Text-Enhanced Video
Once your text is added and styled, you can export your project through the Deliver page:
Select Format and Codec depending on your needs (MP4/H.264 for web, ProRes for professional use).
Check Resolution and Frame Rate to ensure clarity of your text.
Click Add to Render Queue and Start Render.
Tips: For social media, consider exporting in vertical format (1080x1920) while adjusting text positioning for optimal visibility.

Common Mistakes to Avoid
Overcrowding the screen with text: Keep it minimal to maintain viewer focus.
Using unreadable fonts or colors: Contrast is key; avoid neon colors on bright backgrounds.
Ignoring text timing: Ensure that text appears long enough for viewers to read.
Neglecting mobile preview: Always test your video on multiple devices to ensure readability.
Practical Use Cases for Adding Text
YouTube Thumbnails and Titles: Text enhances click-through rates when combined with engaging visuals.
Educational Videos: Captions, labels, and annotations make content accessible.
Corporate Presentations: Titles and lower thirds give a polished professional appearance.
Cinematic Projects: Subtle text animations can serve as opening credits or scene labels.
Frequently Asked Questions
Q1: What is the difference between Text and Text+ in DaVinci Resolve?
Text is basic, perfect for simple titles or captions. Text+ offers advanced animation, 3D capabilities, and detailed styling options for professional editors.
Q2: Can I add text to multiple clips at once?
Yes, you can copy a text layer and paste it across clips. Using adjustment clips with text applied is another efficient method.
Q3: Is Fusion necessary for text animation?
Fusion is optional but recommended for complex animations. Basic motion can be achieved directly in the Edit page.
Q4: Can I use third-party fonts in DaVinci Resolve?
Absolutely. DaVinci Resolve supports any font installed on your system, including Google Fonts, Adobe Fonts, and purchased typefaces.
Conclusion
Mastering how to add text in DaVinci Resolve unlocks countless creative possibilities, from simple subtitles to cinematic titles and dynamic motion graphics. By understanding the Edit page, Inspector panel, and Fusion page, you can customize, animate, and export text in professional quality. Incorporating these techniques ensures that your videos communicate effectively, maintain aesthetic appeal, and engage audiences across all platforms. Whether you are a beginner or an advanced editor, applying these methods will elevate your projects and give you greater control over visual storytelling.