Introduction
Digital footage can sometimes feel too clean or sterile, especially when you’re trying to achieve a cinematic, timeless look. One way to add depth, character, and authenticity is by making your video resemble 35mm film. DaVinci Resolve, the industry-standard video editing software from Blackmagic Design, offers powerful tools to emulate film grain, color profiles, and dynamic range that mimic traditional 35mm film. In this guide, we’ll explore step-by-step methods, real-world tips, and advanced techniques to give your digital footage that coveted filmic quality.

Why 35mm Film Look Matters
The 35mm film aesthetic is prized for its:
Organic grain structure: Unlike digital noise, film grain adds texture and a tactile feel to footage.
Dynamic color rendition: Film naturally handles highlights and shadows in a pleasing, non-linear way.
Cinematic depth: The subtle imperfections of film, like slight vignettes or color shifts, create a more immersive viewing experience.
Many modern productions—independent films, music videos, or commercials—use 35mm film emulation to make digital footage feel more cinematic. According to Blackmagic Design user forums, projects that integrate film emulation see increased audience engagement and higher perceived production value.
Step 1: Choose the Right Footage Settings
Before applying film emulation, it’s essential to shoot footage with the right mindset:
Log or RAW Footage: Shoot in Blackmagic RAW or a log profile like BMD Film or S-Log3. These formats preserve dynamic range and give maximum flexibility in post-production.
Correct Exposure: Slight underexposure can preserve highlight details that help emulate film’s natural roll-off.
Avoid Over-Sharpening: Film has soft edges; avoid in-camera sharpening or noise reduction that makes footage look sterile.
Step 2: Apply Film Grain
Film grain is the key element that makes digital footage feel like 35mm:
Open the Color Workspace: Switch to the Color tab in DaVinci Resolve.
Add a Node for Grain: Right-click in the node editor, select
Add Serial Node.Use Film Grain Plugins or Built-In Tools:
DaVinci Resolve Studio includes a Film Grain effect under OpenFX.
Third-party options like FilmConvert Nitrate or Dehancer Pro provide advanced grain simulation and film stock emulation.
Adjust Intensity: Subtle grain works best; too much can look artificial. Experiment with size, softness, and opacity to match the desired 35mm look.
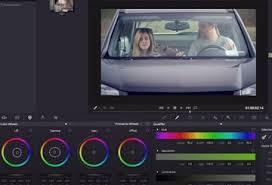
Step 3: Emulate Film Color
Film has a distinct color response that can be mimicked using LUTs (Look-Up Tables) or manual grading:
Use Film Emulation LUTs: Popular LUTs include Kodak 2383, Fuji Eterna, and Vision3 500T. Import them into Resolve via
Color > LUTs > Import.Manual Grading:
Adjust contrast curves to replicate film’s soft highlight roll-off.
Slightly reduce saturation in midtones for natural skin tones.
Add a subtle color cast to shadows or highlights (e.g., teal shadows, warm highlights) to mimic analog film.
Soft Glow or Halation: Adding a low-opacity glow on highlights can emulate the slight blooming effect of film stock.
Step 4: Adjust Dynamic Range and Contrast
35mm film handles highlights and shadows differently than digital:
Lift Shadows: Keep some shadow detail instead of crushing blacks completely.
Lower Highlights: Avoid clipping whites to maintain a natural roll-off.
Use Curves: In DaVinci Resolve’s Curves panel, create a gentle S-curve for filmic contrast.
Step 5: Add Vignette and Subtle Imperfections
Film is rarely perfect, and minor imperfections can enhance realism:
Vignette: Apply a slight vignette to draw attention to the center and emulate lens characteristics of 35mm cameras.
Light Leaks or Dust Scratches: Optional overlays or plugins can introduce subtle imperfections for authenticity.
Motion Blur and Shutter Adjustments: Slightly adjust motion blur to emulate the mechanical shutter of a 35mm camera.
Step 6: Advanced Techniques
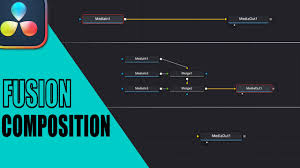
Use DaVinci Resolve Fusion: Add overlays like film sprockets or simulated gate weave for a vintage feel.
Color Timing Across Shots: Film maintains consistent grading across multiple shots; apply similar LUTs and curves to all clips.
Blend Multiple Nodes: Use multiple nodes for grain, color, and glow separately, allowing independent adjustments.
Blackmagic Design professionals often recommend layering effects in nodes instead of a single node for more control, which is essential when striving for a high-quality 35mm emulation.
Common Mistakes to Avoid
Overdoing Grain: Too much grain can distract viewers and reduce clarity.
Incorrect White Balance: Film stocks handle colors differently; avoid pushing digital white balance too far.
Ignoring Highlights and Shadows: Film’s dynamic range is part of its charm; digital footage with crushed blacks or blown highlights loses the authentic feel.
FAQs
Q1: Can I make any digital camera footage look like 35mm film?
Yes, but shooting in log or RAW footage provides the best results. Footage with poor exposure or heavy compression may limit the effectiveness of film emulation.
Q2: Do I need DaVinci Resolve Studio to achieve this look?
Studio version is recommended because it includes advanced film grain effects, noise reduction, and OpenFX plugins, though free version users can still use LUTs and manual grading.
Q3: Are there recommended plugins for 35mm film emulation?
Yes. Popular options include FilmConvert Nitrate, Dehancer Pro, and Red Giant Magic Bullet Looks. Each offers authentic grain, color, and film stock emulation.
Q4: Can I apply 35mm film look to already edited projects?
Absolutely. You can grade your timeline at any stage, but applying film emulation earlier allows for better integration with transitions, effects, and edits.
Conclusion
Transforming digital footage into 35mm film look in DaVinci Resolve is achievable with a combination of film grain, LUTs, color grading, and subtle imperfections. Shooting in RAW or log formats, applying authentic grain, and carefully adjusting dynamic range can create a cinematic aesthetic that resonates with viewers. Whether you’re making indie films, music videos, or short films, mastering this process elevates the quality and storytelling impact of your projects.
With attention to detail, the right tools, and deliberate adjustments, your digital edits can carry the timeless appeal of 35mm film.