So, you’ve finished editing your footage in DaVinci Resolve, and suddenly realize:
“Wait, this isn’t the aspect ratio I want.”
Whether you’re going for a cinematic 2.35:1, a vertical Instagram Reel, or a perfect square for social ads, knowing how to change aspect ratio in DaVinci Resolve is critical if you want your final output to match your platform — and your vision.
Here’s the good news: Resolve makes aspect ratio changes super flexible, whether you want to adjust your timeline, reframe your clips, or export for a specific screen size.
This in-depth guide will walk you through every possible way to change the aspect ratio — and make it look right.
What Is Aspect Ratio and Why Should You Care?
Before we jump into buttons and settings, let’s clarify what aspect ratio means.
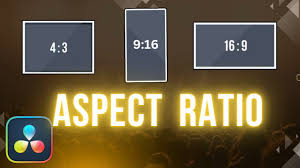
Aspect ratio = the width-to-height ratio of your video frame.
Common aspect ratios:
16:9 – Standard widescreen (YouTube, TV)
9:16 – Vertical (TikTok, Instagram Reels, YouTube Shorts)
1:1 – Square (Instagram feed posts)
2.39:1 or 2.35:1 – Cinematic widescreen (films, trailers)
4:3 – Old-school TV, nostalgic feel
If your video is in the wrong aspect ratio, it can appear stretched, cropped, or boxed with black bars — none of which are good unless done intentionally.
How to Change Aspect Ratio in DaVinci Resolve (The Right Way)
There’s more than one way to change the aspect ratio in DaVinci Resolve, and each serves a different purpose depending on when and why you're doing it.
Let’s explore.
1. Change Aspect Ratio by Adjusting Timeline Resolution
This is the most direct way to change your project’s base aspect ratio.
Steps:
Open your project in DaVinci Resolve (any version from 17 to 19+ works).
Go to the Edit page.
Click the gear icon at the bottom right to open Project Settings.
Under the Master Settings tab, locate Timeline Resolution.
Manually input custom resolutions:
1920 x 1080 → standard 16:9
1080 x 1920 → vertical 9:16
1080 x 1080 → square 1:1
1920 x 800 → cinematic 2.40:1
Click Save.
? Tip: Changing timeline resolution doesn’t stretch your footage, but you may need to reframe clips manually if they were shot in a different format.
2. Change Aspect Ratio Using Output Settings (Without Affecting Timeline)
If you want to keep your timeline intact but export in a different aspect ratio:
Steps:
After editing, go to the Deliver page.
Under Render Settings, choose Custom Export.
Scroll to Resolution and change it to your target:
For 2.35:1 → Try 1920 x 817
For Instagram → Try 1080 x 1350
For vertical Reels → 1080 x 1920
Select Scale full frame with crop under Scaling (important).
Add to render queue and export.
This method is perfect when you're delivering the same video in multiple formats.
3. Add Letterbox (Cinematic Black Bars) for Film Look
Want that Hollywood vibe without cropping? You can simulate the cinematic aspect ratio by adding black bars.
Here’s how:
Method A – Using Adjustment Clip + Crop
Go to the Edit page.
Add an Adjustment Clip over your timeline.
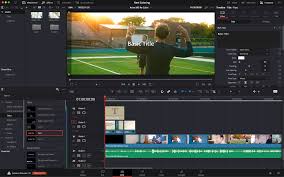
In the Inspector, go to Cropping and adjust Top and Bottom until you get the desired bars.
Method B – Use Built-in Film Look Title Template
Go to Effects Library → Titles → Fusion Titles.
Find “Cinematic Bars” or use a custom Fusion overlay.
Drag it over your timeline and adjust opacity if needed.
?? Pro Tip: For a 2.35:1 look on 16:9 footage, crop about 132 pixels top and bottom from 1920x1080 footage.
4. Change Individual Clip Aspect Ratio Using Inspector
If only some clips need adjustment (like vertical videos on a horizontal timeline):
Select the clip.
Open the Inspector.
Use Zoom, Position X/Y, and Crop to reframe it.
Use "Match output aspect ratio" in the clip's scaling options if needed.
This gives you clip-level control without touching the whole timeline.
5. Use the Fusion Page for Custom Aspect Ratio Masks
For advanced users or stylized edits:
Select a clip and go to the Fusion page.
Use rectangle mask nodes to define your aspect ratio.
Pipe it into a background or alpha channel to simulate cropping.
You can even animate the bars for transitions!
Real-World Example: Reframing a YouTube Video for Instagram
Let’s say you edited a 16:9 talking-head video and now want to post a vertical teaser on Instagram Reels.
Steps:
Duplicate your project.
Change timeline resolution to 1080 x 1920.
Reposition your subject using Inspector → Position X/Y.
Add animated text or callouts for vertical format.
Export and upload — no cropping needed.
Key Things to Know About Aspect Ratios in Resolve
Changing timeline resolution doesn’t stretch — it simply changes the canvas size.
When downscaling from a wide to tall aspect ratio, manual reframing is often required.
You can use adjustment clips to apply letterboxing or global zoom.
The DaVinci Resolve free version supports custom resolutions (no need for Studio unless you’re going over 4K or using HDR tools).
Common Mistakes When Changing Aspect Ratio
Forgetting to reframe: Your subject might get cut off.
Wrong scaling mode: Use “Scale full frame with crop” for consistent exports.
Exporting without previewing: Always preview in Deliver before final render.
Mixing clips with different aspect ratios without planning transitions.
Final Thoughts: Mastering Aspect Ratios in DaVinci Resolve
If you’re serious about multi-platform content creation — YouTube, TikTok, Instagram, or cinematic video — learning how to change aspect ratio in DaVinci Resolve is a must-have skill.
Resolve gives you:
Full control over timeline, clip, and export settings
Built-in cinematic bar overlays
Flexible scaling and masking options
The more you experiment, the easier it becomes to work in multiple formats. Once you get the hang of it, you’ll be able to deliver the same video in horizontal, vertical, and square formats — all without sacrificing quality or composition.
So next time a client says, “Can I get a vertical version too?” — you’ll say, “Already done.”
Frequently Asked Questions (FAQ)
Q1: What’s the best aspect ratio for YouTube?
16:9 (1920x1080) is standard. Avoid uploading in non-standard formats unless it's part of your style.
Q2: Can I export in 9:16 in the free version of DaVinci Resolve?
Yes. Just go to timeline resolution and input 1080 x 1920 manually.
Q3: Does DaVinci Resolve support 4:5 or square videos?
Absolutely. Set your resolution to 1080 x 1350 (4:5) or 1080 x 1080 (1:1) depending on your needs.
Q4: What’s the easiest way to add black bars for a cinematic look?
Use an adjustment clip and crop top/bottom or apply a cinematic overlay from the Fusion title library.
Q5: Will changing aspect ratio affect my clips?
Only the visual frame changes. You’ll likely need to reposition clips manually to keep subjects in view.
Learn more about AI MUSIC


