Looking to merge images with AI but don't know where to start? You're not alone! Whether you're creating social media content, designing marketing materials, or just having fun with photo editing, AI image merging tools have revolutionised how we combine multiple photos seamlessly. From basic photo blending to advanced composite creation, these smart tools can help you achieve professional results in minutes, not hours.
What is AI Image Merging and Why Should You Care?

AI image merging is basically like having a super-smart photo editor that understands how different images should blend together naturally. Instead of spending hours manually masking and adjusting layers in Photoshop, AI tools can automatically detect edges, match lighting, and blend colours to create seamless composites.
Think of it this way - remember those awkward family photos where someone's head looks like it was just pasted on? AI merging prevents that! The technology analyses the content of both images, understands the lighting conditions, and creates natural transitions between different elements.
The coolest part? Most of these tools are either free or super affordable, making professional-level photo editing accessible to everyone. No more excuses for bad composite photos!
Top 7 AI Tools for Image Merging
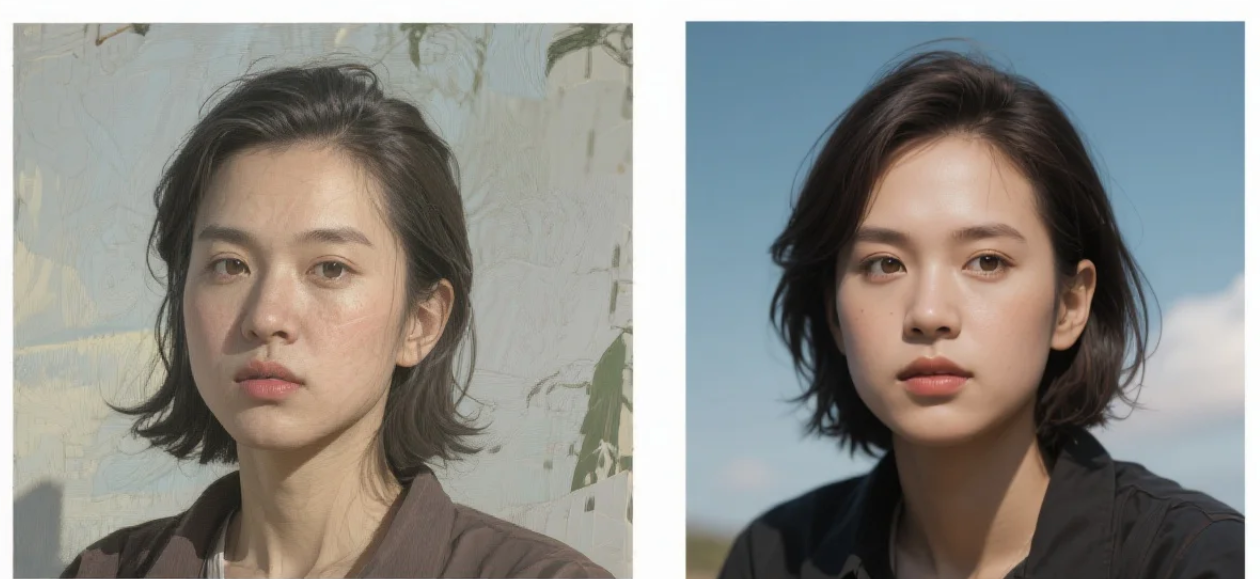
Adobe Firefly - The Professional Choice
Adobe Firefly is honestly a game-changer for anyone serious about image editing. It's integrated into Photoshop and offers incredible AI-powered compositing features. The "Generative Fill" function can seamlessly blend new elements into existing photos, and the results are mind-blowing.
What I love most about Firefly is how it understands context. If you're adding a person to a beach scene, it automatically adjusts the lighting and shadows to match the environment. Plus, it's constantly learning and improving.
Canva AI Background Remover and Merger
Canva's AI tools are perfect for beginners who want quick results. The background remover works like magic - just upload your image, click remove background, and boom! Then you can easily merge it with any other image or template.
The best part? It's incredibly user-friendly. Even my tech-challenged aunt figured it out in 5 minutes. The free version gives you plenty of merging options, though the paid version unlocks more advanced features.
Remove.bg + Photopea Combo
This is my go-to budget-friendly solution! Remove.bg handles the background removal perfectly, then I use Photopea (free Photoshop alternative) for the actual merging. It's like having professional tools without the professional price tag.
The quality is surprisingly good, and you get full control over the merging process. Perfect for small businesses or content creators on a tight budget.
DALL-E 2 Outpainting
DALL-E 2's outpainting feature is absolutely wild! You can literally extend images beyond their original borders or merge completely different concepts. Want to add a dragon to your living room photo? DALL-E 2 can make it look surprisingly realistic.
The AI understands artistic styles and can match the mood and lighting of your original image. It's more creative than traditional merging, but the results can be spectacular.
Midjourney with Image Prompts
Midjourney isn't traditionally a merging tool, but its image prompt feature can blend multiple images in creative ways. You upload your base images and describe how you want them combined - the AI does the rest.
The artistic quality is incredible, though it's more suited for creative projects than precise photo editing. Perfect for artists and designers looking for inspiration.
Runway ML
Runway ML offers some seriously advanced AI tools for video and image editing. Their inpainting and background replacement features are perfect for complex merging tasks. It's a bit more technical than other options, but the results are professional-grade.
Photoleap (Mobile)
For mobile users, Photoleap is fantastic! The AI cutout tool works brilliantly on phones, and you can merge images directly on your device. Perfect for quick social media content creation when you're on the go.
Step-by-Step Guide: How to Merge Images with AI
Method 1: Using Canva (Beginner-Friendly)
Step 1: Prepare Your Images
First things first - gather your images and make sure they're decent quality. Blurry or low-resolution photos won't merge well, no matter how good the AI is. I recommend using images that are at least 1080p for best results.
Step 2: Remove Backgrounds
Upload your main subject image to Canva and use the "Background Remover" tool. The AI will automatically detect the main subject and remove everything else. If it makes mistakes, you can manually refine the edges using the brush tools.
Step 3: Choose Your Background
Either upload your own background image or choose from Canva's massive library. Make sure the lighting and perspective match your subject for the most natural look.
Step 4: Position and Scale
Drag your subject onto the background and adjust the size and position. Pay attention to perspective - if your background shows a distant view, your subject shouldn't be massive unless you're going for a surreal effect.
Step 5: Fine-tune with Effects
Use Canva's shadow, highlight, and colour adjustment tools to make the merge look natural. Adding a subtle drop shadow can work wonders for realism.
Step 6: Export and Review
Download your merged image and review it on different devices. Sometimes what looks good on your computer screen doesn't translate well to mobile.
Method 2: Advanced Merging with Adobe Firefly
Step 1: Set Up Your Workspace
Open Photoshop and create a new document with your desired dimensions. Import both images as separate layers - this gives you maximum control over the merging process.
Step 2: Use Generative Fill
Select the area where you want to merge elements and use Firefly's Generative Fill. Describe what you want to add or change, and the AI will create seamless blends that match your existing image perfectly.
Step 3: Refine with Traditional Tools
Even AI isn't perfect! Use layer masks, blending modes, and adjustment layers to fine-tune the merge. The combination of AI power and manual control gives you professional results.
Step 4: Match Lighting and Colour
This is crucial! Use adjustment layers to match the colour temperature and lighting between your merged elements. Firefly helps, but manual tweaking often makes the difference between good and great.
Step 5: Add Realistic Details
Consider adding shadows, reflections, or other environmental details that would naturally occur. These small touches make merged images look genuinely realistic.
Step 6: Final Quality Check
Zoom out and view your image at 100% to check for any obvious merge lines or inconsistencies. Sometimes stepping away and coming back with fresh eyes helps spot issues.
AI Image Merging Tools Comparison
| Tool | Difficulty Level | Cost | Best For |
|---|---|---|---|
| Adobe Firefly | Advanced | £19.97/month | Professional work |
| Canva | Beginner | Free/£10.99/month | Social media content |
| Remove.bg + Photopea | Intermediate | Free/£8.85/month | Budget-conscious users |
| DALL-E 2 | Beginner | Pay per use | Creative projects |
| Photoleap | Beginner | Free/£7.99/month | Mobile editing |
Pro Tips for Better AI Image Merging
Lighting is Everything
Seriously, this cannot be overstated! Matching lighting conditions is what separates amateur merges from professional-looking composites. If your subject was photographed in bright daylight, don't merge it with a moody sunset background unless you're going for an artistic effect.
Look at the direction of shadows, the colour temperature of the light, and the overall mood. AI tools are getting better at this, but your eye is still the best judge.
Perspective Matters
Make sure your merged elements make sense from a perspective standpoint. A person photographed from below shouldn't be placed in a scene shot from above - it just looks weird and unnatural.
Edge Quality Control
AI edge detection is impressive but not perfect. Always zoom in and check the edges of your merged elements. Soft, natural edges usually look better than hard, cut-out lines.
Common Mistakes to Avoid
Ignoring Image Resolution
Don't try to merge a low-res image with a high-res one - the quality difference will be obvious. Either upscale the lower resolution image or resize everything to match.
Overdoing the Effects
Just because you can add 15 different effects doesn't mean you should! Subtle AI enhancements usually look more professional than heavily processed images.
Forgetting About Colour Harmony
Your merged image should have a cohesive colour palette. If everything looks like it belongs in different universes, the merge won't be convincing.
Frequently Asked Questions
Can I merge images for free?
Absolutely! Tools like Canva, Remove.bg, and Photopea offer excellent free options for AI image merging. You might have some limitations on exports or advanced features, but basic merging is definitely possible without spending money.
How long does AI image merging take?
It depends on the tool and complexity, but most AI merging tools work in seconds to minutes. Simple background removal and merging in Canva takes under 2 minutes, while complex Photoshop composites might take 10-15 minutes.
Do I need design experience to use AI merging tools?
Not really! That's the beauty of modern AI image editing. Tools like Canva and Photoleap are designed for complete beginners. You'll get better results with some basic understanding of composition and lighting, but you can definitely start creating immediately.
What image formats work best?
PNG and JPEG work universally well. PNG is better if you need transparency, while JPEG is fine for standard merging. Most AI tools accept common formats, so you shouldn't have compatibility issues.
Can AI detect if an image has been merged?
Advanced AI detection tools are getting better at spotting manipulated images, but well-executed merges using professional tools can still pass most detection systems. The key is creating natural-looking composites that don't have obvious inconsistencies.
The Future of AI Image Merging
AI image technology is evolving incredibly fast. We're seeing improvements in understanding 3D space, better lighting analysis, and more intuitive user interfaces. Soon, we'll probably just describe what we want in plain English, and AI will handle all the technical aspects.
Real-time merging is already possible on high-end devices, and mobile AI capabilities are catching up quickly. The democratisation of professional-level image editing is happening right now!
AI image merging has transformed from a complex, time-consuming process into something anyone can master in minutes. Whether you're using free tools like Canva for quick social media posts or investing in Adobe Firefly for professional work, the key is understanding your needs and choosing the right tool for the job. Remember, even the best AI is just a tool - your creativity and understanding of good composition will always be the most important ingredients for stunning merged images. Start with simple projects, experiment with different tools, and don't be afraid to combine AI automation with manual fine-tuning for the best results!