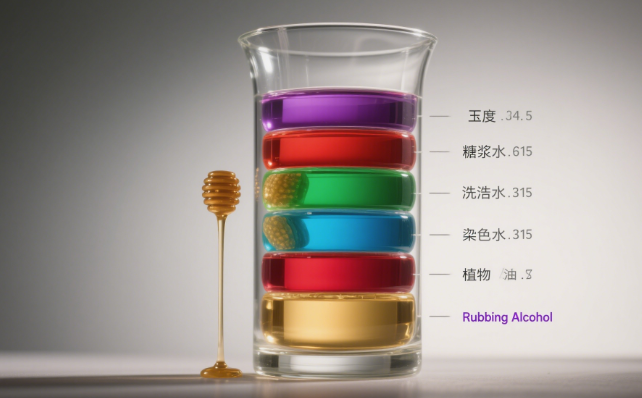
Ever wondered why oil floats on water or honey sinks below dish soap? Today, we're turning your kitchen into a mini-lab with a Liquid Layers Experiment that visually demonstrates density differences! This simple yet stunning project is perfect for science teachers, parents, or anyone craving a hands-on understanding of density. Plus, it doubles as an Instagram-worthy rainbow column ??. Let's dive in!
Why Liquid Layers Matter in Science
Density is a fundamental property of matter, and the Liquid Layers Experiment is like a beauty pageant for liquids—the densest sinks to the bottom, while the least dense floats on top. This principle applies everywhere: layered cocktails, ocean salinity, and even oil spill cleanup techniques rely on it.
By building a density column, you'll:
Visualise abstract concepts: Seeing density differences beats textbook equations any day.
Sharpen scientific thinking: Observe, predict, and test—just like a real researcher.
Blend subjects seamlessly: Mix chemistry (density calculations), physics (buoyancy), and art (colour layering).
Materials for Your Liquid Layers Experiment
| Liquid | Density (g/mL) | Colour Suggestion |
|---|---|---|
| Honey | 1.42 | Golden (natural) |
| Corn syrup | 1.33 | Blue food colouring |
| Dish soap | 1.03 | Green |
| Water | 1.00 | Red |
| Vegetable oil | 0.92 | Clear (natural) |
| Rubbing alcohol | 0.79 | Purple |
Pro tip: Use a tall, narrow glass for the best layering effect!
5 Steps to Create Perfect Liquid Layers
Step 1: Sort Liquids by Density
Remember: "Honey at the bottom, alcohol on top!" Refer to the table above for exact densities.
Step 2: Pour Slowly and Steadily
Key techniques:
Pour along the glass's inner wall or use a spoon's back to guide the liquid.
Aim for ~2 cm per layer—too fast = messy mixing!
For stubborn pairs (like oil and water), tilt the glass to reduce splash.
Step 3: Observe the Layers
Your finished column should show 6 distinct coloured bands. Shine a laser pointer sideways to see the Tyndall effect at layer boundaries ?.
Step 4: Test Floating Objects
Drop in small items to see where they settle:
Raisin (density 1.5): Plunges to the honey layer
Plastic toy duck (0.95): Floats at the oil layer
Coin (7.8): Instant honey-diver
Step 5: Photograph and Clean Up
Photo tips:
Use a black backdrop
Side lighting highlights layers
Label each liquid's density
Clean-up: Either extract layers separately or dispose after 24 hours (save oil and alcohol for reuse).

Advanced Liquid Layers Projects
Ready to level up? Try these:
Density Volcano: Drop effervescent tablets into honey—watch bubbles erupt through layers ??
Rainbow Swirl: Gently stir with a straw and time how layers re-separate ?
Heat Experiment: Warm the glass's base to see temperature's effect on density order ??
Tools & Troubleshooting
Recommended Gear
| Tool | Brand | Purpose |
|---|---|---|
| Kitchen scale | OXO Good Grips | Precise density measurements |
| Transfer pipette | Amazon Basics | Controlled pouring |
| Food colouring | Wilton Gel | Vibrant layer contrast |
Common Issues & Fixes
Q: My layers mixed! Help?
A: Use a syringe to remove the mixed portion and re-pour. If fully blended... call it a "science smoothie" (but don't drink it!) ??
Q: No corn syrup—alternatives?
A: Maple syrup (density 1.32) or saturated saltwater (1.2), though colours may darken.
Q: How to preserve the column?
A: Store in a sealed, opaque container for 1-2 weeks (alcohol evaporates fastest).
